Homebrew 5PFH Expansion
04.18.2025
![]()
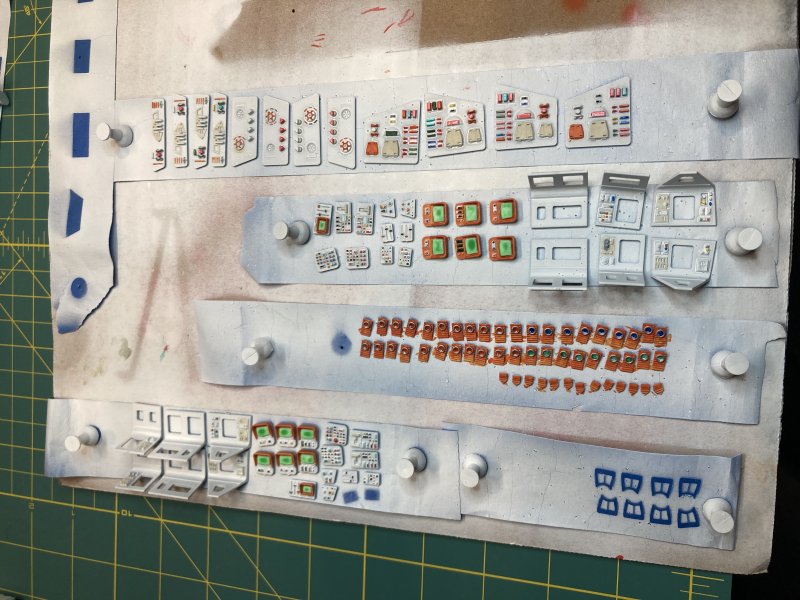
Part of my lack of blog updates have been due to playing with ChatGTP to make expansion(s) for Five Parsecs From Home. Part AI learning, part game design, part.. well, goofing off. After a couple of months I think my effort to inject GI Joe and Cobra into a minis-game is sharable. With that, I now make a short post and share PDFs to download. I may go into a long diatribe of how this all came about later. Maybe.
Permalink
5PFH game dev vs Factions(PDFs)
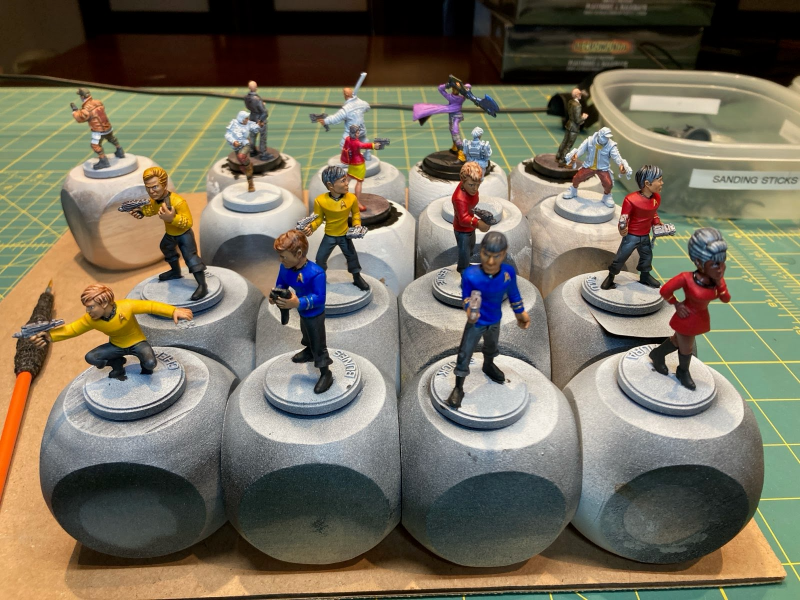
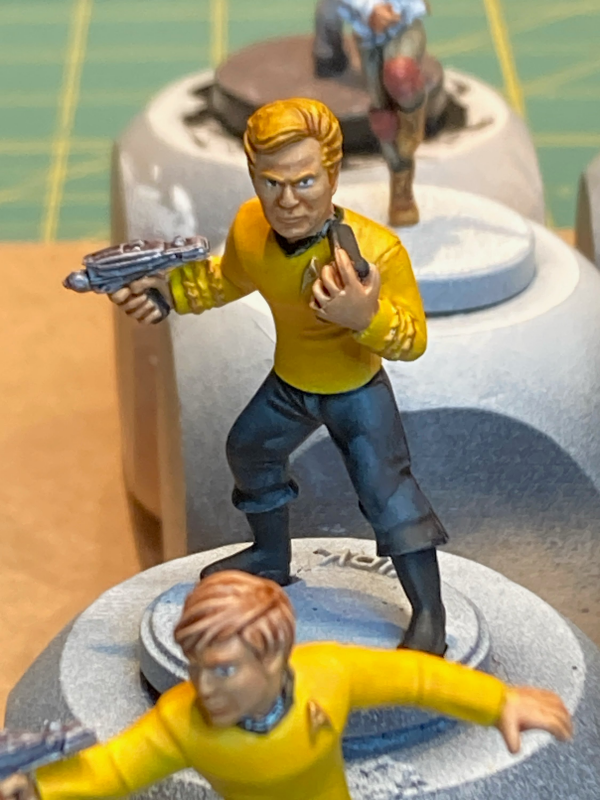
Star Trek Away Team - They have clothes!
04.17.2025
Taking to heart the short and sweet minimum posting I said I was going to do, here's (mainly) Star Trek Away Team minis I've been working on intermittently for a while. Skin, pants & boots, and golden/bronze parts were done a while back. This week I used some Citadel red, blue, and a brownish-yellow for 2 coats, at least, of uniform tops. Last night I went back with appropriately matched contrast paints to help blend things in a little better. I don't know why I'm getting brush shmears on mostly flat surfaces these days, but the base coat + contrast approach works for me in covering most things up. Everyone got some hair along the way too. Next is to touch up the things I managed to paint over while doing all the previous steps - Dr McCoy has a huge blue blob on one of his hands. The bases will probably be kept simple as each has the character name raised on it.
Permalink
gaming miniatures Star Trek Away Team
Still Alive
04.13.2025
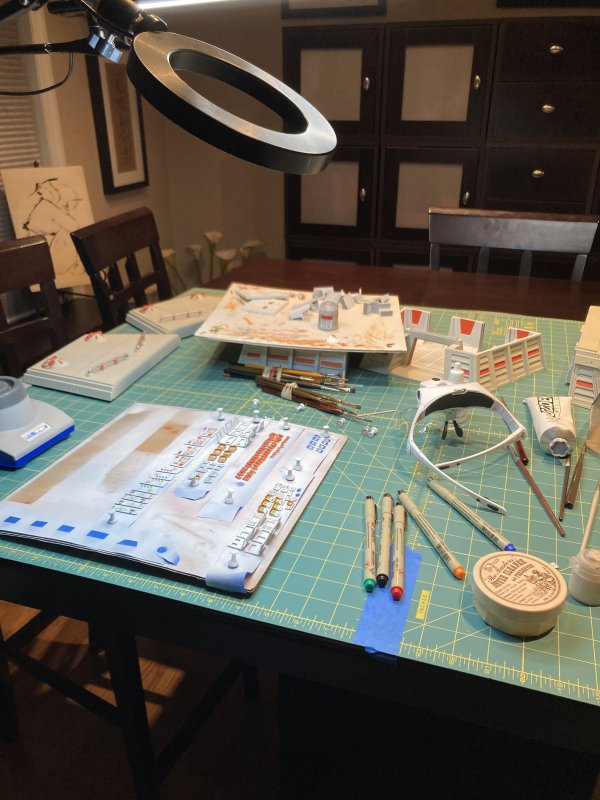
A quarter way through the year and I've had nothing post-worthy. On the good side, that means nothing bad enough to want to publicly complain about. Conversely, I seem to have a handful of projects that are somewhere between Not Started and Almost Done. As an impetus to move closer to More Done Than Not, I'm going to force myself to at least whip up some work-in-progress post(s) this week. Probably more likely to have some short posts with a pic or 2 than long diatribes. We'll see what happens.
Star Wars Bunker and Printed Landing Pad
12.29.2024
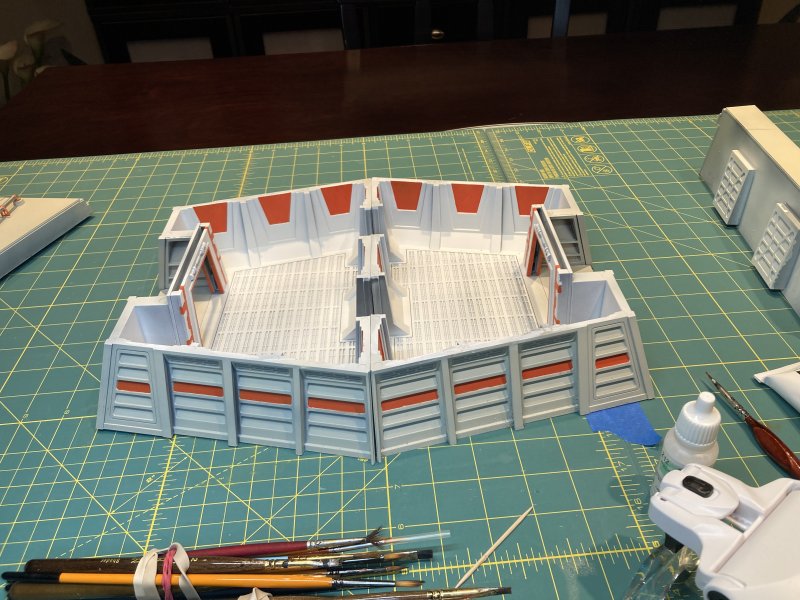
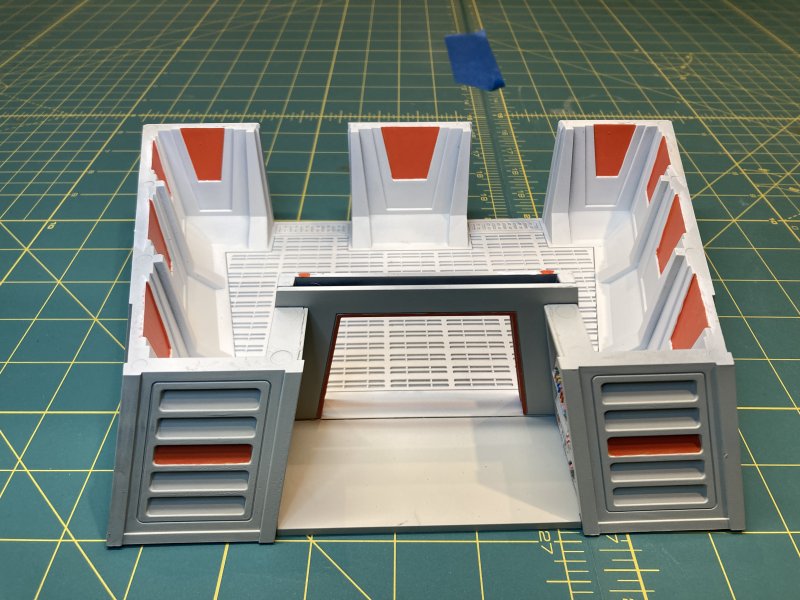
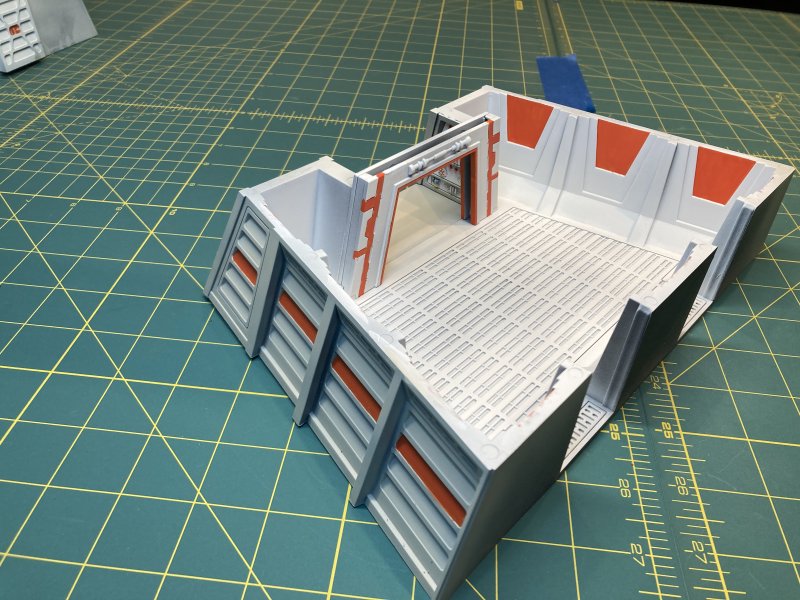
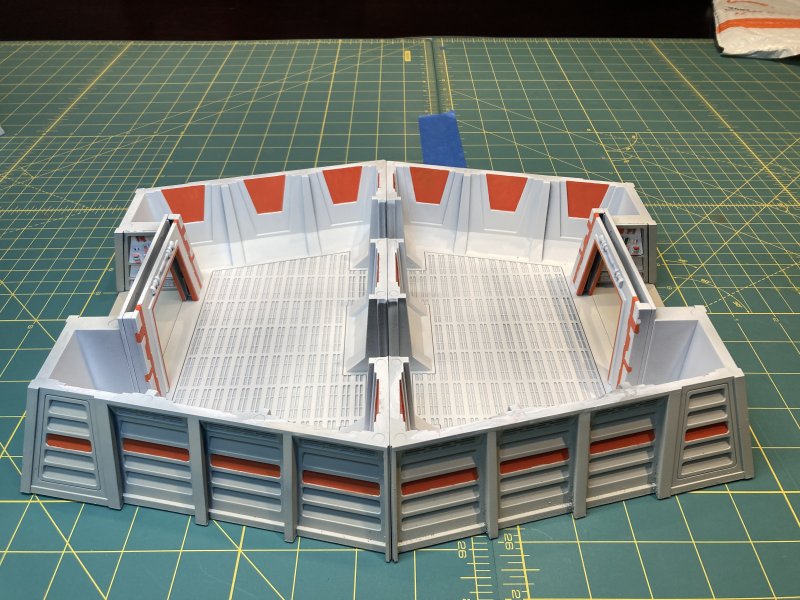
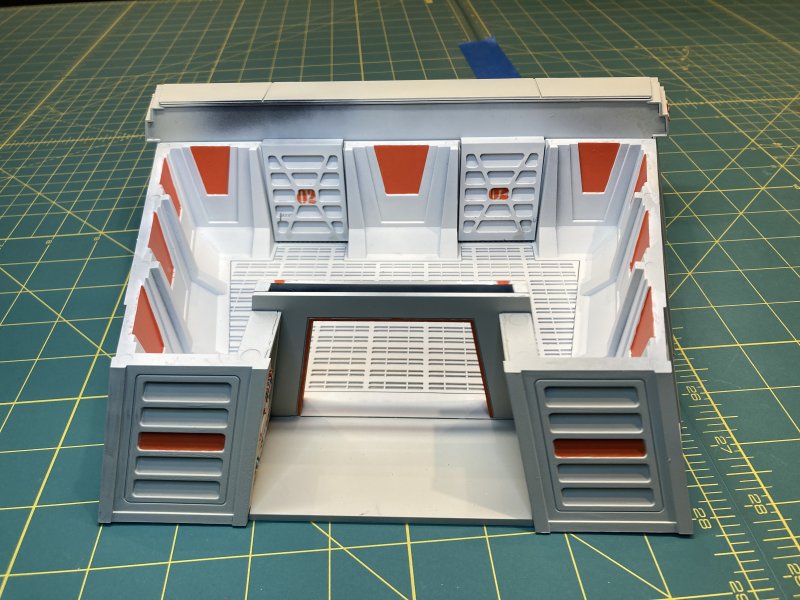
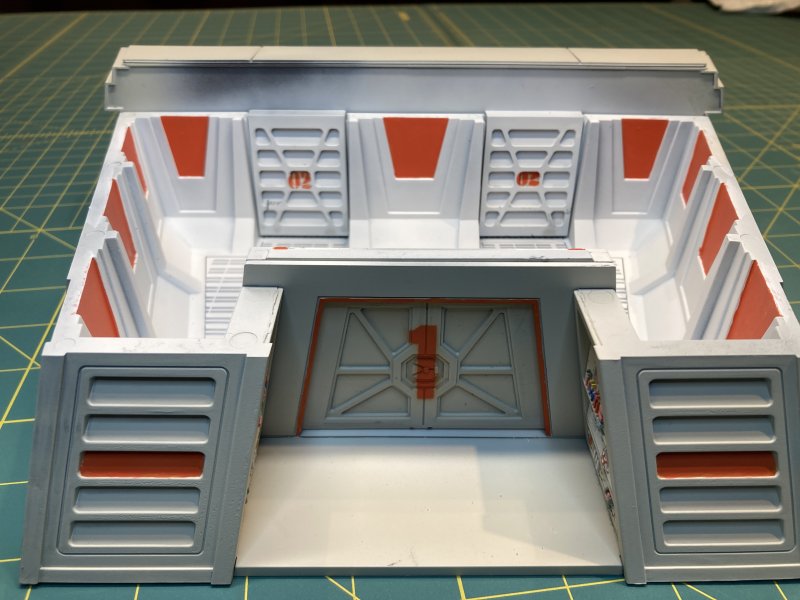
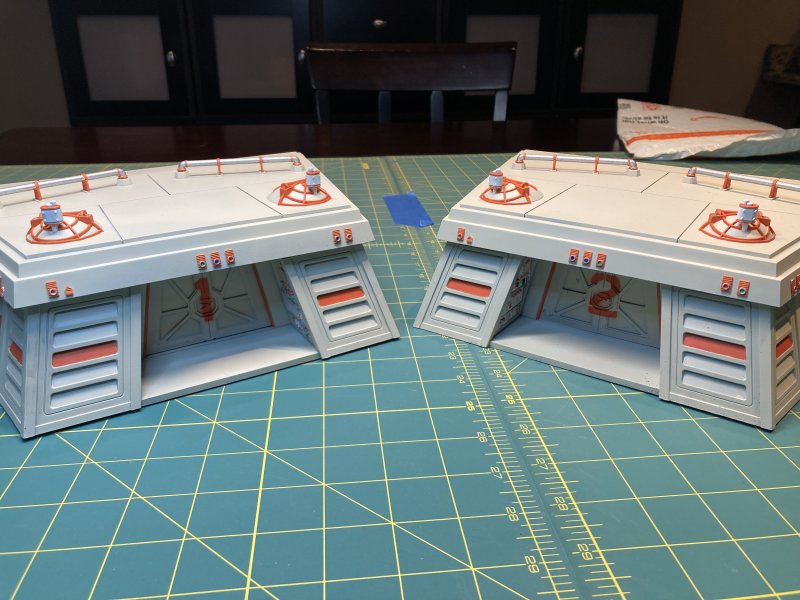
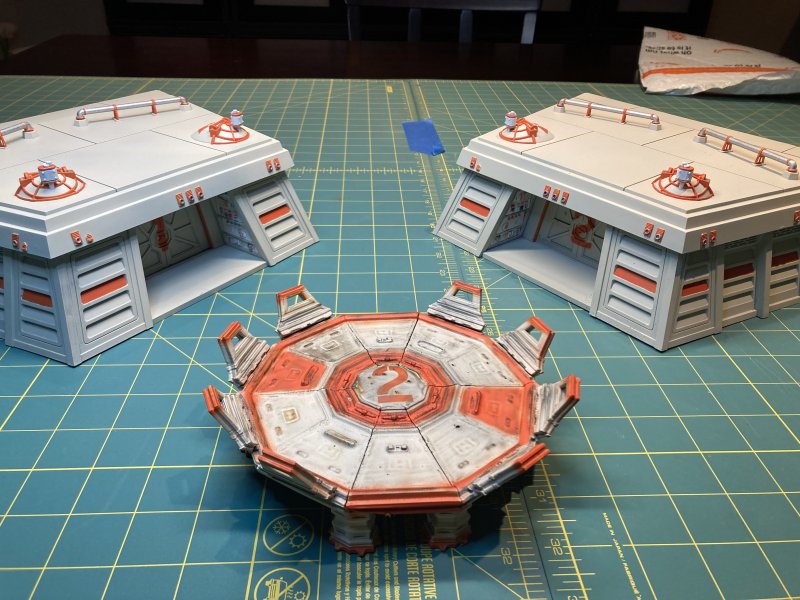
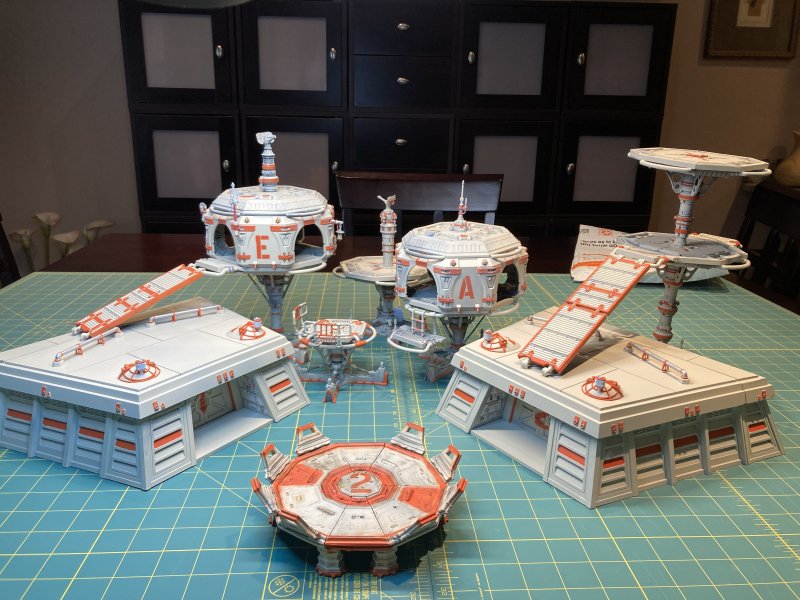
My focused project for the year has been the Necromunda Hab-buildings for the basis of whatever sci-fi setting I'm going with moving forward. Back in May I made my first post showing some progress, not realizing at the time that there would be but 2 more related posts over the next 4 months. Though to be honest, I've not posted a lot this year. Why? It seems that making slow progress on a large batch of buildings where one looks a whole lot like another does not lend itself to things interesting enough to post. Hence, this latest thing I've been working on for a little over a month is suddenly just shown here out of the blue.
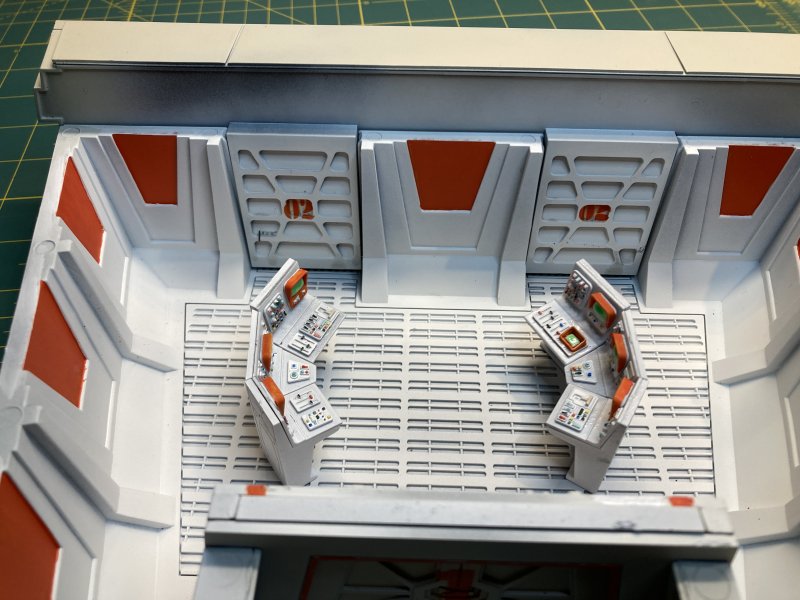
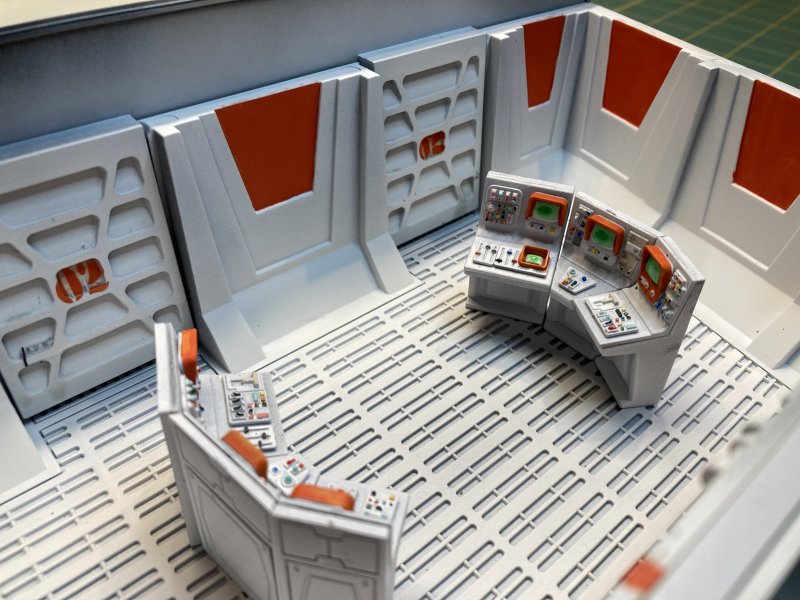
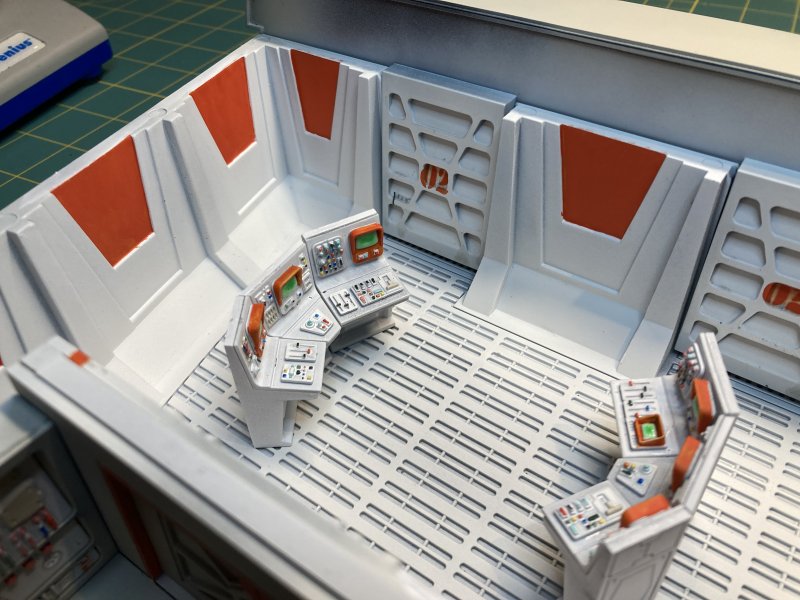
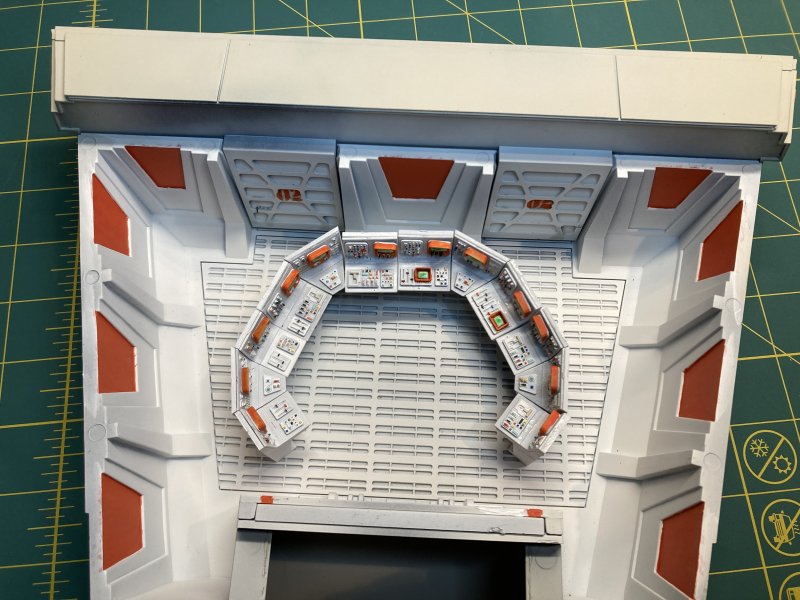
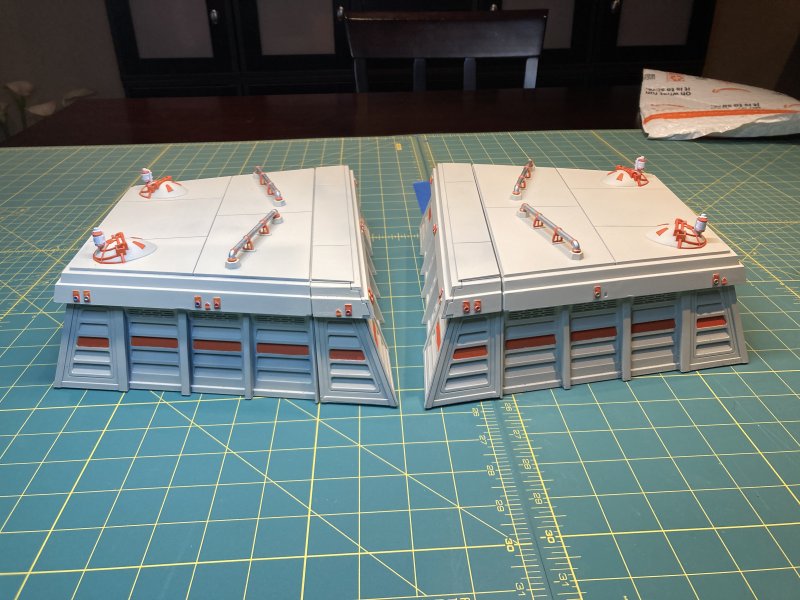
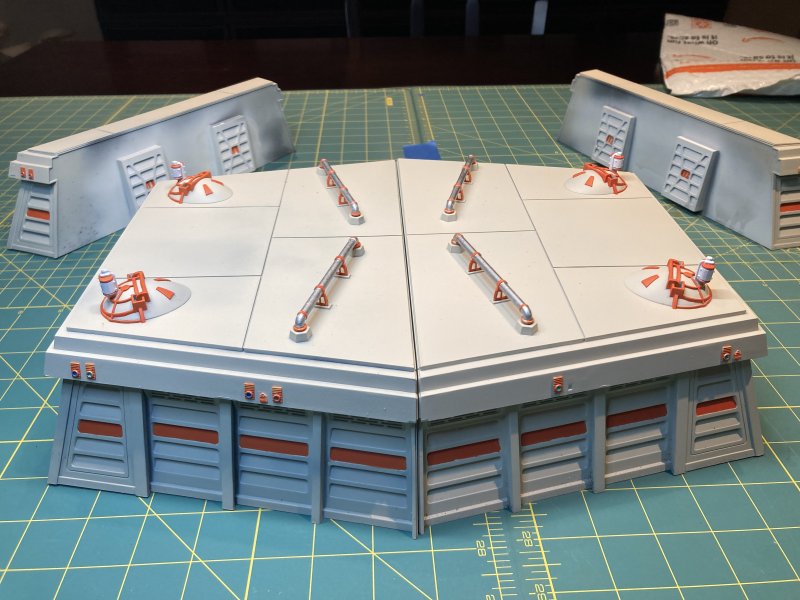
Thanks to a sale at a local shop who decided to get out of the Star Wars Legions business, I got a lot of stuff at half price. In one case, that meant I picked up 2 Imperial Bunkers. The real reason I picked up 2 was that a video I saw at some point from the publisher showed 2 bunkers can fit back-to-back and look really cool. While I don't really envision myself making a board with lush forest scenery and a bunker being defended (or is it attacked?), I quickly saw my white/orange paint scheme used on the Necromunda buildings working on the bunkers and allowing them to fit in with my existing sci-fi scenery. Thus, I had a plan.
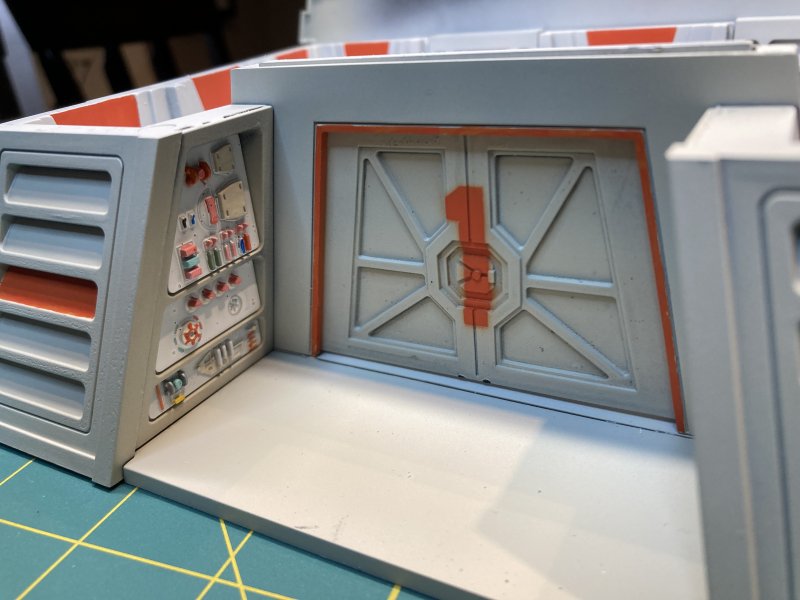
It was a good plan, too. Minimal gluing was involved, and most of the work was in picking out details in control boards and screens. This was definitely one of those times that painting before gluing was the route to go, just to help getting to those details easier. The best new experiment: for the computer monitors, I just added some green contrast paint on top of the white primer, then a dollop of gloss on top of that. I thought it was pretty close to a retro-green glow of a monitor.
Everything else was finding the right places to add orange to add a little interest. The outside of the bunker is still Wraith Bone white, but the inside is plain primer white. This also helps to break things up a little, since the inside and outside aren't exactly the same colors. Keeping with my Necromunda building stenciled letters, the blast doors for the bunkers got some stenciled numbers added on. One drawback to those blast doors - thanks to a couple of layers of paint + sealant, I'm not sure I can lift those doors up into the open position now that they're down.
I played around with placing the bunkers together VS apart, and both work well. I can always add a homemade section to join the bunkers, as this also seems a popular video topic.
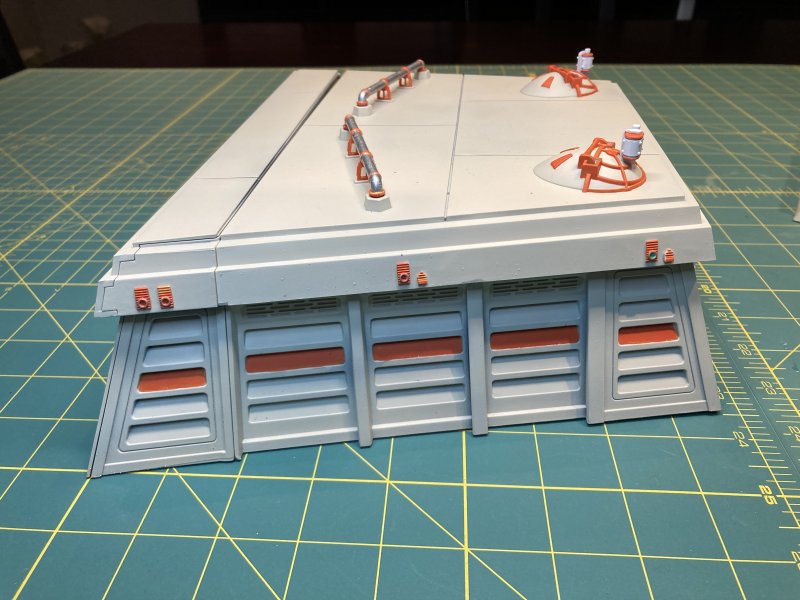
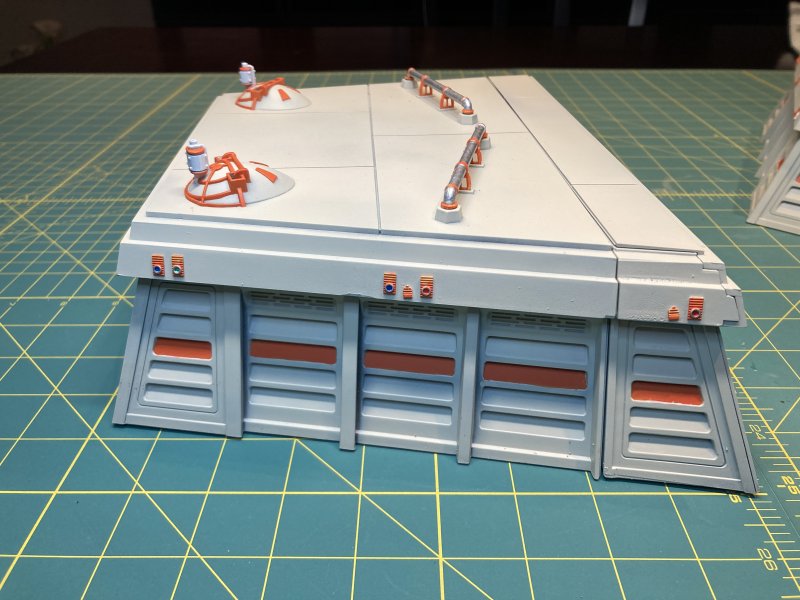
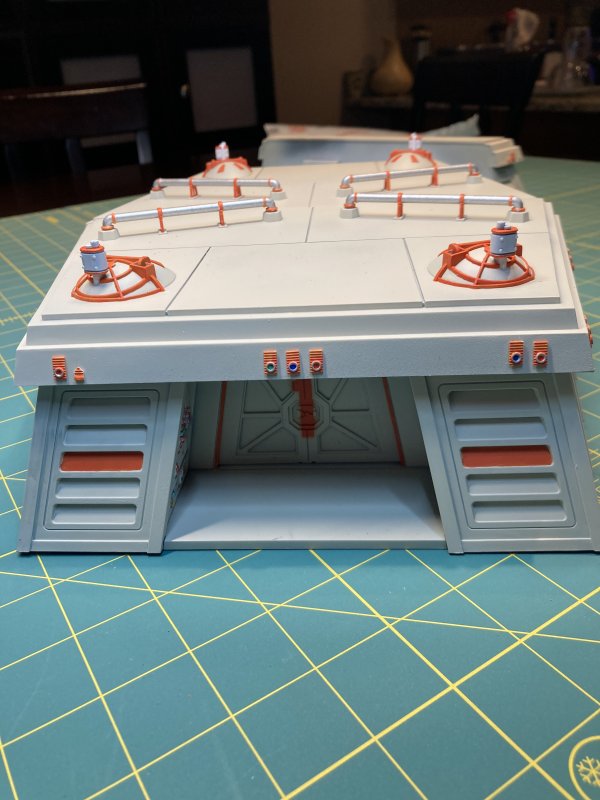
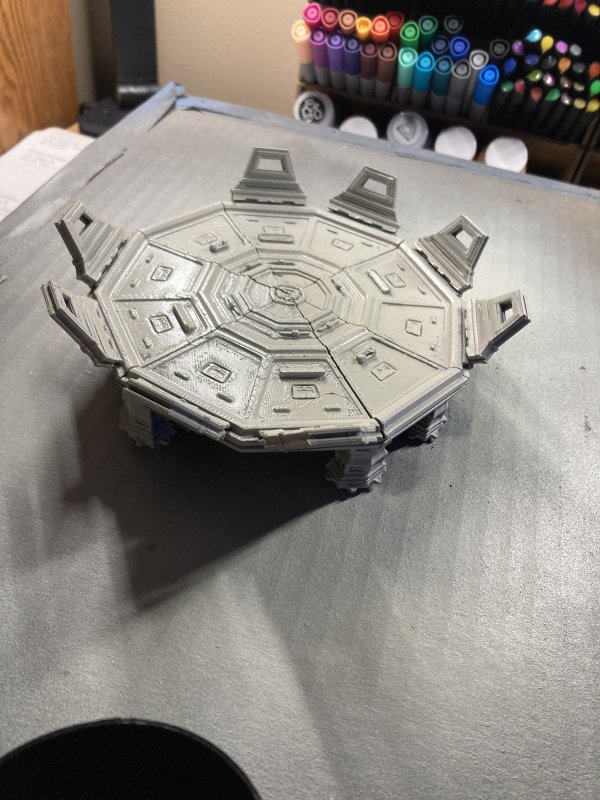
Thanks to Jerry's new FDM Printer, he printed a landing pad for me. This was meant as a printer test and to add something different to the sci-fi layout VS trying to think of what would be landing on it. As such, I asked Jer to scale it down to about a 5" footprint. He got it printed out with minimal trouble (I think), annd after a little sanding and pinning some parts to help fortify the super glue bond, I was ready to try painting this thing.
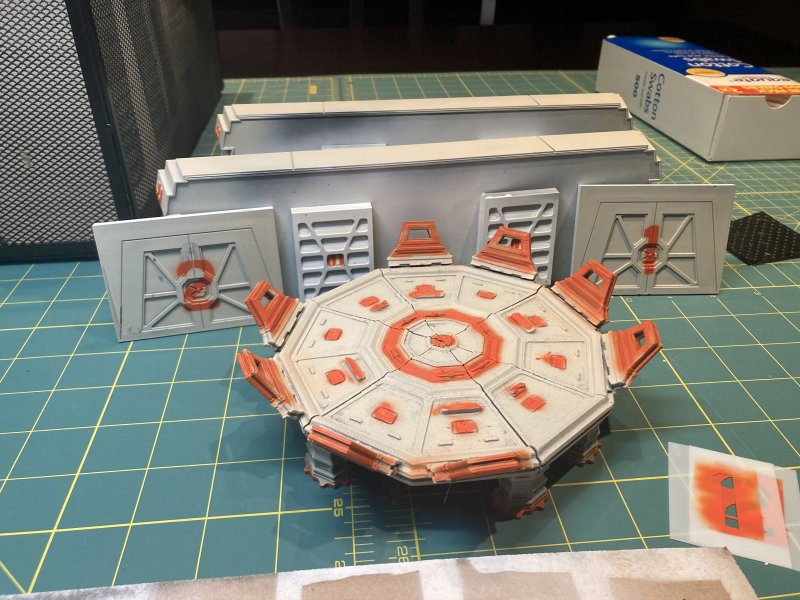
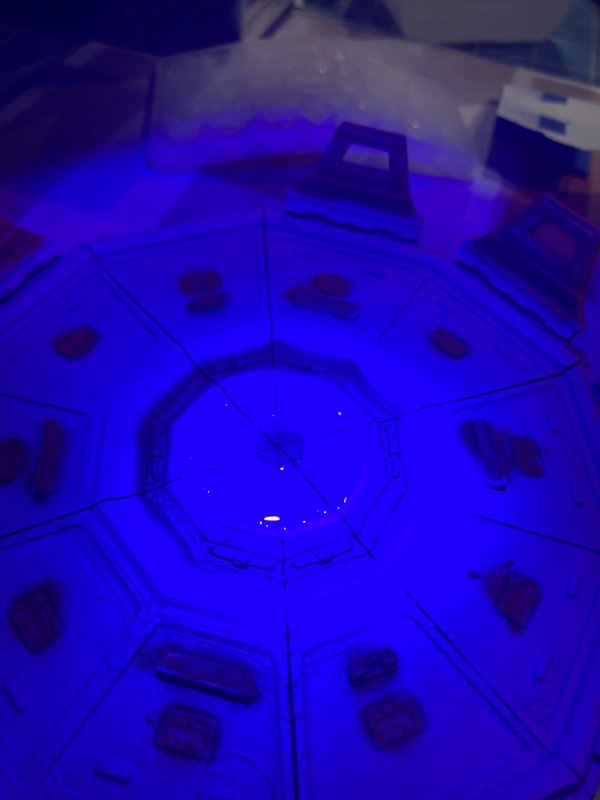
Some of the surface was a little rough, and I used that as an excuse to use some UV Resin I bought a while back to see how it would work. I added some resin to the center, used my UV flashlight on it for 4 min, and had a solid covering in the center. I go out and add a layer of black primer, then spray on some Wraith Bone with a slight zenithal approach - basically from all the "above" angles, down to about 90° It was here I noticed my UV Resin test wasn't as smooth as I'd hoped. Some bubbles looked to have popped on the surface, and the edges weren't as uniform as I thought. I grabbed my seldom used airbrush and decided to freehand orange highlights for stripes, etc.
And to be honest, it didn't turn out very good. It took me until the next day to admit that. The airbrush wasn't flowing smoothly when I first started, and instead of trying to fix it I just muddled through. Additionally, I was still spraying paint like I was afraid of the airbrush. Why? I need to get over that!
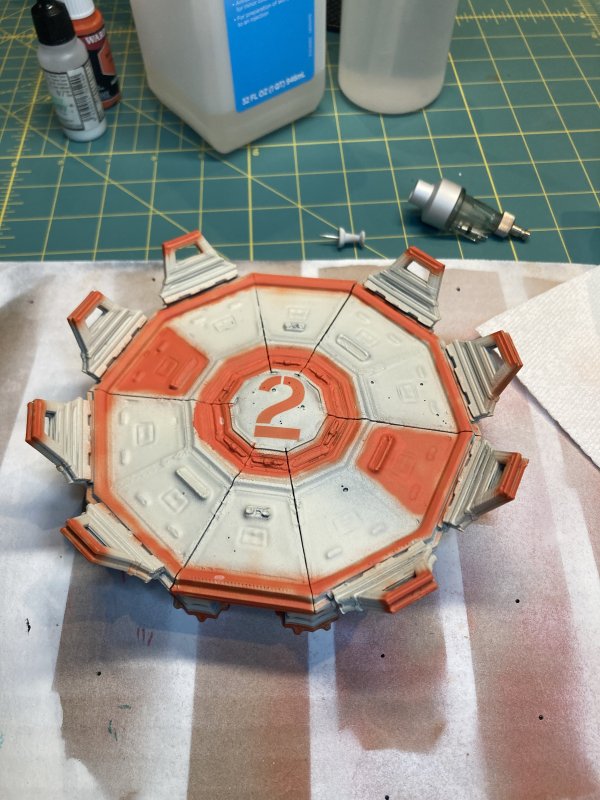
To help with getting over that, I made a 2nd pass. First, I added some Mod Podge Dimensional Magic (poor man's resin) to more of those "rough" spots, which would help smooth things out a little more. After that had dried, I grabbed the black primer and started over on the landing pad. Black, then Wraith Bone. And after a thorough cleaning of the airbrush followed by tracking down where I had last put the bottle of Flow Improver, I started to airbrush landing bad 2.0.
The second pass went a lot better with the airbrush. I picked out some different details, and decided to add a stenciled number to the center. As this was a landing pad, weathering with some heat-focused soot and fallout would fit in well. I've been avoiding most weathering on my sci-fi stuff, as I don't know what shade the ground will usually be. Here the weathering was intended to be man-made from above and not local flora dependent, so I effectively ignored the parts I normally focus on when weathering. It was weird, but in the end the landing pad turned out pretty good.
Now I have a nice collection of buildings, and landing pad, to call on as the basis for my sci-fi setting. Much like the 4Grounds Mall, maybe I'll get around to using it in a game someday. But that's not the true purpose of this stuff - I just like making scenery.


Permalink
3D Printer Necromunda scenery Star Wars Legion
Bullet Dice
12.15.2024
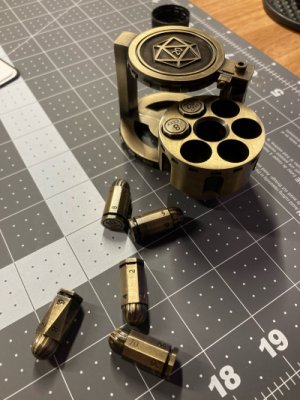
As the latest terrain building/painting phase is taking a lot longer between anything interesting enough to post about, I instead present a Black Friday toy that had been sitting in my Amazon wish list since April-ish. The CZYY Metal Polyhedral Bullet Dice Set of 7 with Spinning Revolver Cylinder Container - Cyberpunk Style Dice for Warhammer 40K, D&D, Sci-Fi, War, or Crime Theme Tabletop Games (Bronze). Or as I call it, Bullet Dice Revolver!
Do I need more dice? No.
Do I need dice in the shape of bullets? Definitely not.
When was the last time I rolled dice? Maybe 2021.
Do these dice have a little spinny gun cylinder thing? Yes.
Then once it remains in my wishlist until a good enough sale, I must purchase it. Thus, on Black Friday, I purchased it.
I've still not rolled the dice for a game, but I have rolled them. I've also spun the cylinder/holder a lot, as it makes for great desk bric-a-brack.
I was lunching with Jerry yesterday and noted that for the past few years I've gotten some overpriced hobby-related tool that I enjoy. Ultrasonic Xacto, teeny Electric Drill, etc. While not really a tool, maybe this will count as filling that void this year?
Blog Archive
As always, correct spelling is optional in any blog entry. Keep in mind that any links more than a year old may not be active, especially the ones pointing back to Russellmania (I like to move things around!).
Tags have been added to posts back to 2005. There may be an occasional old blog that gets added to the tag list, but in reality what could be noteworthy from that far back?
Blog Tags
3D Printer (27)
4ground (32)
4ground-mall (40)
5PFH (1)
action figures/toys (10)
airbrush (7)
Aliens (1)
Amazon (12)
antenocitisworkshop (11)
Atlas O Gauge (2)
Batman Miniature Game (2)
Battletech (1)
belt sander (12)
Blood Bowl (4)
boardgames (77)
books/comics (19)
computers hate me (5)
conveyances (15)
diet (53)
dreams (7)
fallout (1)
feng shui (1)
Foundry (3)
Gale Force Nine (1)
game dev (23)
gaming miniatures (231)
gaslands (10)
gastric sleeve (34)
Green Stuff World (2)
Hasslefree (9)
Hero Forge (1)
hobbies (102)
Jailbirds Minis (2)
kevin smith (1)
Knight Models (2)
malifaux (2)
Marvel Crisis Protocol (2)
mckays (1)
models (11)
mom (32)
moon light (5)
movies/tv/dvd (60)
Necromunda (4)
ninja division (1)
Pathfinder Deepcuts (1)
pilonidal cyst (5)
plastcraft (2)
programming/interweb (41)
rambling (60)
random (367)
random maintenance (3)
Reaper Bones (3)
reaper chronoscape (32)
renovation/remodelling (25)
road trip (27)
salesforce (1)
sarissa precission (2)
scenery (19)
Star Trek Away Team (1)
Star Wars Legion (1)
studio miniatures (3)
ttcombat (12)
video games (51)
vs Factions(PDFs) (1)
walking dead (36)
wargame foundry (3)
work (6)
wrestling (45)
zombicide (2)
Zombicide Invader (19)
zombie mall (23)