Necromunda Orange - Done Enough
09.06.2024
Since last time in Necromunda land I made an effort to try and be consistent with my painting for a while. After work I would take a break for an hour or 2, and then I would turn on the radio and paint for what would turn out to be 2-4 hours. For 2 weeks I did this. I got a lot done, and I also learned that how I paint can lead to text neck, or maybe I should call that Necromunda Neck?
I had gotten the 1st pass of orange on all the buildings and started the roofs at the end of the last post. I had more roofs, some platforms I'd forgotten about, and then some walkways and ladders that I had completely forgotten about. Oh, and it seems most of the time a 2nd coat of orange is needed to really get the coverage I need. And add in some other colors because just white-ish and orange is boring. By the way, I'm not the steadiest hand so go back and cover up errant brush strokes with some white-ish.
I didn't know the above was the plan when I started, but it turned out that way. It sounds like hell, but it was actually kind of nice. After work, with the radio on, I was able to honestly turn my brain off and just go about painting. When I normally turn my brain off, everything just lurks in the background and I don't attention. This time - off.
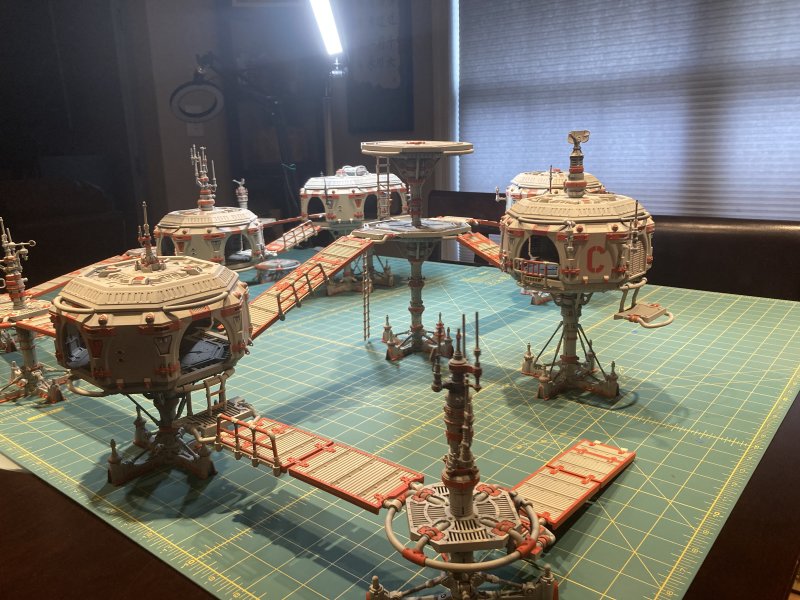
There aren't really any interesting stories or tidbits from this round of painting. No big discovery. No big mistake or learning experience. Currently, I think all of this is about 90% done. I need to add some weathering to help cover those errant brush stroke fixes. While putting everything together for some of the beauty shots below, I didn't even notice those cover ups. After dedicating a big chunk of time to painting this set, I'm ready to switch gears for a little while. As such, I'm calling Space:199-Necromunda Done Enough, For Now. There's some more stuff I want to add in (later on), so revisiting will be a good time to add in the weathering.


2024 Model Show
08.25.2024
Last year I found out about the Huntsville plastic model show the day after it ended, when I was looking at the website of one of the attending vendors. I thought that might have been fun, so I made a Google Calendar note when they announced the next show - Aug 24, 2024. That date was one I actually kept up with and would monitor the sponsoring group's Facebook page to make sure I both had the right date and that the date didn't change.
Saturday of the show came and I was ready to go. I had no idea what to really expect. I've seen videos of various model show/contests online and most have a section of models on display for judging, and then a section of vendor tables that pretty much reminds me of flea markets. My plan was to go and look at the models on display, then check out vendors to see if there was anything special enough that I didn't think I could get locally or online - and there, I wasn't really expecting anything or have a "must buy something before leaving" urge.
The show info had vendors showing up at 8:00 to start setup, model contest entries/admission starting at 9:00, contest judging starting at 1:00. 11:00 seemed like the right time for me to show up. Everyone setting up should be set, and the 1st wave of hardcore people would be done doing whatever people do. It was an oddly pleasant 83° when I arrived shortly after 11:00. I went in and to the left were models on display, to the right 4 rows of 10-12 tables per row of vendors.
The lines winding through the contest models were, for me, a little narrow and not moving in an easily navigable direction, so I opted to go right and browse vendor tables. Along the right-most wall I kind of scanned while walking by - old cars... old military planes.. old cars... old cars ... really old cars... random aircraft. This continued along the length of the wall, where I ran into why I don't go to conventions, shows - basically any large-group thing occupied by people interested in the subject/hobby a lot more than I am.
3 hrs from when people started coming in, 5 minutes after I entered, I walked into a wall that is best described as the odor of old man musk on a hot day plus onions. Once I smelled it, I had a hard time getting away from it. I continued walking the tables and almost speed-browsing as I continued to see car... car... Corsair... Apache... car.. It was here that I ran into a more random, but oft present, reason for not going to special-interest-group centered events.
The random person milling about is oblivious to anyone else, which generally steers them toward coming across as an asshole. I first noticed this when looking (from a couple of feet away) at 3ft high stacks of boxes filled with models atop a table. An old guy in blue shorts is suddenly standing in front of me. Ok, he's not moving. I move to the right to see the next stack. He soon moves to the right and is still right in front me. Even better - I swear he's an onion-smell source. I skip down to the end of the next table, skipping about 4 rows, and there's fewer people so I move in a little closer to the stacks. Maybe a minute later, blue shorts shows up beside me and is trying to wedge in as if I'm in his way. Deciding to go look at other tables, on a return pass I found out blue shorts was working and moving models around/filling empty slots as they were being sold. Had there been any empty spots where I was looking before, I might have given him a pass here.
But in general, people just weren't paying attention to other people moving about. Maybe I'm more cognizant of this as I can inadvertently mow somebody down with my mass if I'm not paying attention, but fully 1/4 of the men there - and let's face it, there's maybe 4 women at this thing - these are dudes close to my size. It was here I thought back to my string of 1-and-done events: Star Trek convention, Wrestlemania, comic/gaming things I can't remember any details of right now. It looked like "model show" was going to enter that list.
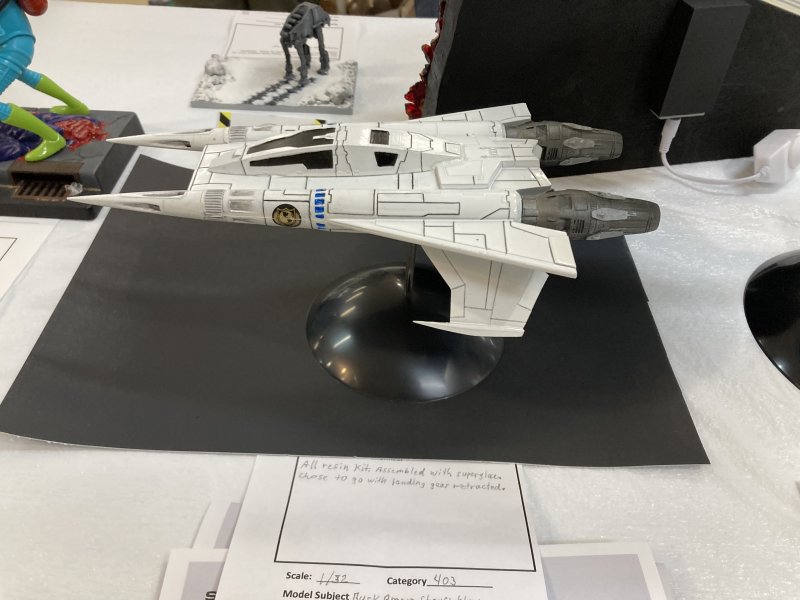
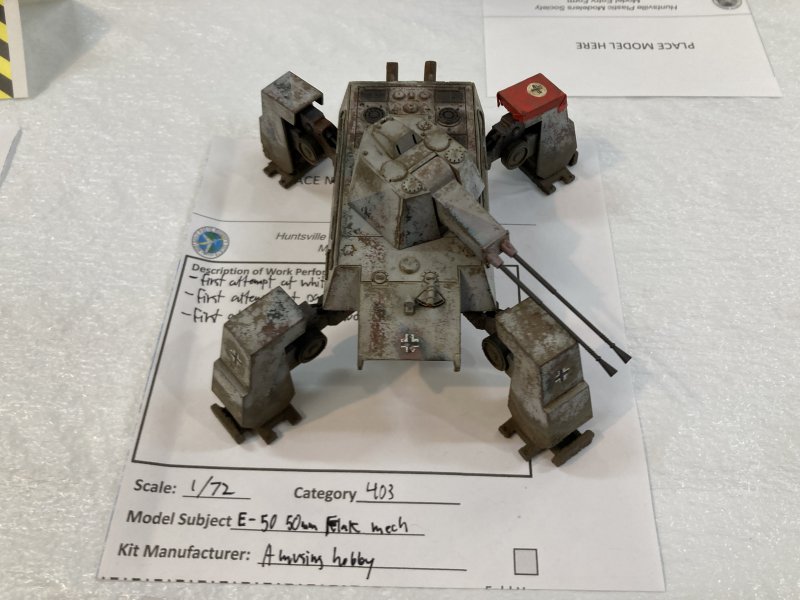
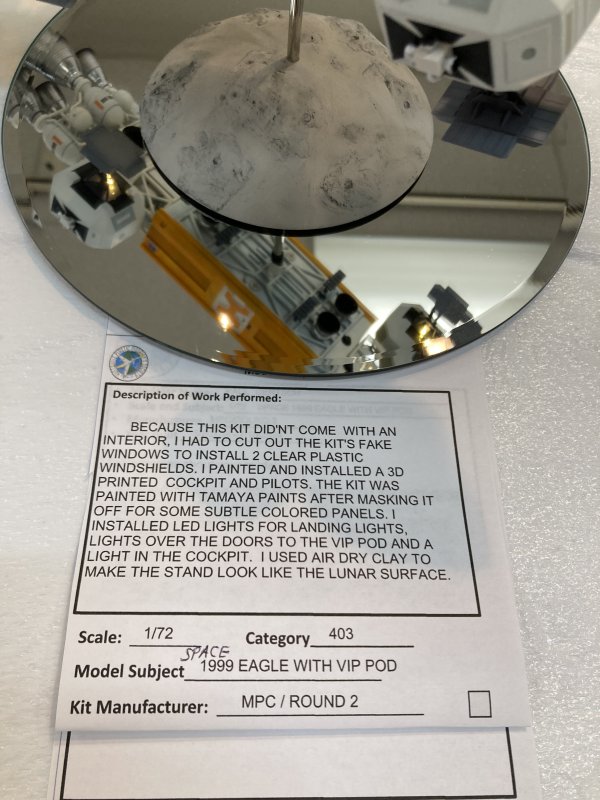
I went and looked at some of the model contest entries. I started on the side that had naval ships and sci fi - the combo of which took up 1 row of tables. The other 5 or 6 rows were cars and aircraft/military, and still seem to have the awkward path to view. Along the back wall were some dioramas, which was a category I specifically wanted to see as that's a little more geared toward my game-painting mindset. I managed to look at some of the aircraft as I looped my way out, and all were good but they just seemed kind of generic-good. I say that as someone who hasn't been able to finish the last 4 model kits I started because I get frustrated with how badly things seem to fit together.
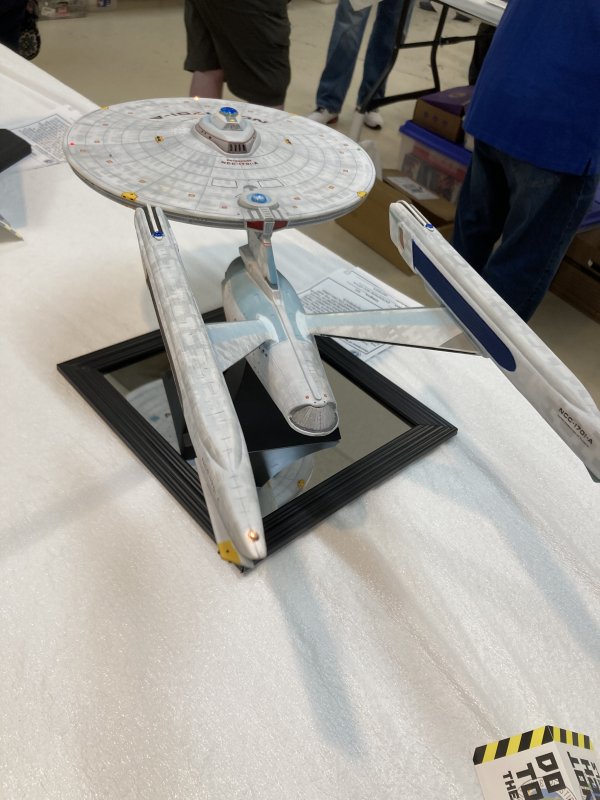
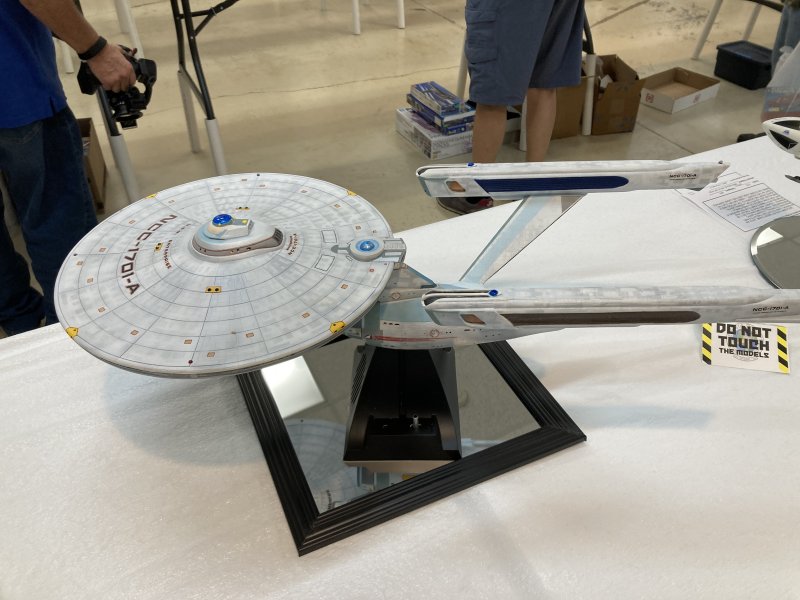
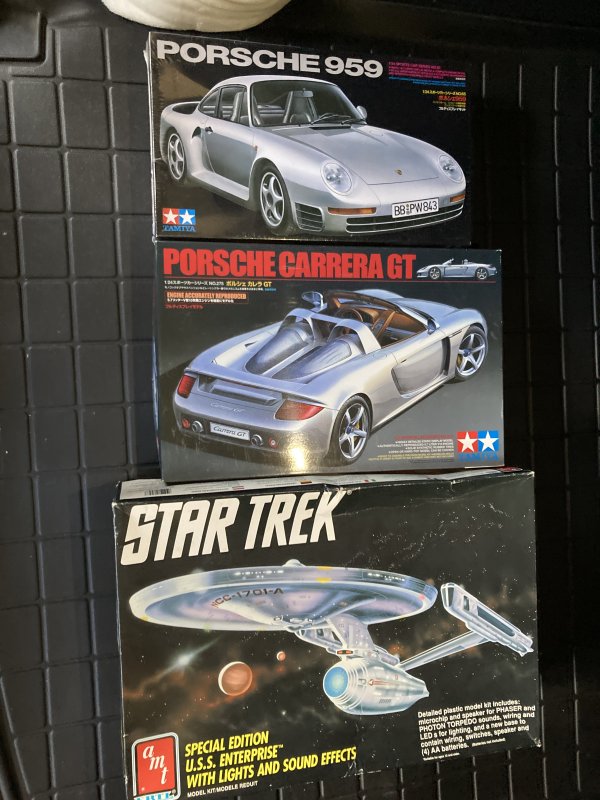
I had reached the point I wanted - browsed vendor wares, looked at some models. The odor had lessened so I went for another quick browse of vendor tables. One had a couple of Tamiya Porsche models that had caught my eye on the initial go around, which unfortunately was where the old man + onion had kicked in. While looking along tables as I walked by, it really was 90% cars/military that I've always seen. I reached the spot with the Tamiya models I'd seen from a distance and looked closer. One was still in the shrinkwrap. Another was open, so I checked to make sure it had everything since that's something you're supposed to do. Then I noticed sitting below the table was a Trek Enterprise with the Light & Sounds kit. I opened up the box to see what was inside, as the honestly friendly guy on the other side of the table said in his best faux-car-salesman voice "what's it going to take to take that home with you today" as he mentioned something about the rarity. There were no instructions for the kit, and it was marked at $50. Even missing instructions, that sounded like a good price for a kit that came out in 1991. We chatted and I added the 2 Porsche models to the Enterprise and managed a 10% discount.
With that, I was out the door and continued on to have lunch with my good close personal friend Charles G. Part of lunch was showing him the pics below. Most of the story time details while viewing pics were about the smell. I started out with no real expectations and a very low bar. I think that's where I left this adventure out. Would I go again? Not unless the vendor who's website I originally learned of this event attend again - as they tend to stock more than cars and military models. Of course, all of those are available for purchase online. If I modelled well enough to enter the contest, that might be interesting. Based on how my re-entry to model making has gone over the past couple of years, I don't think my skills will reach a level I'm comfortable being judge in public for quite some time.


Necromunda Orange
08.17.2024
Back in May I posted that my batch of Necromunda buildings had finally been assembled. And then they fell off the face of the planet, evidently. Glue, gap-filling, sanding, and then more sanding. I knew I needed a little break from it, but I didn't expect it to be this long. And honestly, I haven't been hands-off the buildings for 3 months. I've had lots of little figuring it out moments.
My fairly simple color scheme I last mentioned was a classic US sci-fi of white-ish base color with orange highlights. Think Space:1999, but maybe reverse the base and highlights. I think I last saw this in The Martian and liked it enough it stuck with me and I thought it would be a good alternative to post-apocalyptic grimdark.

Eschewing pure-white, Citadel Wraith Bone seemed a good white, kind of with some built-in age/weathering. But first, instead of just priming everything white like I always do, I finally got a little smarter and started with black. This would give shadows to the nooks and crannies I would invariably miss, and I got try out some zenithal priming with the Wraith Bone because I've never done that on non-people. Step one: a little over 2 cans of Citadel black primer. Ok, that was more cans than I was expecting. And I only gotten 1 can of Wraith Bone. Without going into detail, I then learned of 2 stores locally that carried said Wraith Bone - and both are closer than the Warhammer Store. Step two: a little over 2 cans of Citadel Wraith Bone, zenithalled. To be honest, I should have gotten better coverage with my zenithal layer, there are spots where way too much black still shows through. But after looking at it for a while (off and on for a couple of months, after all), I kind of like it. Maybe that'll be my style?
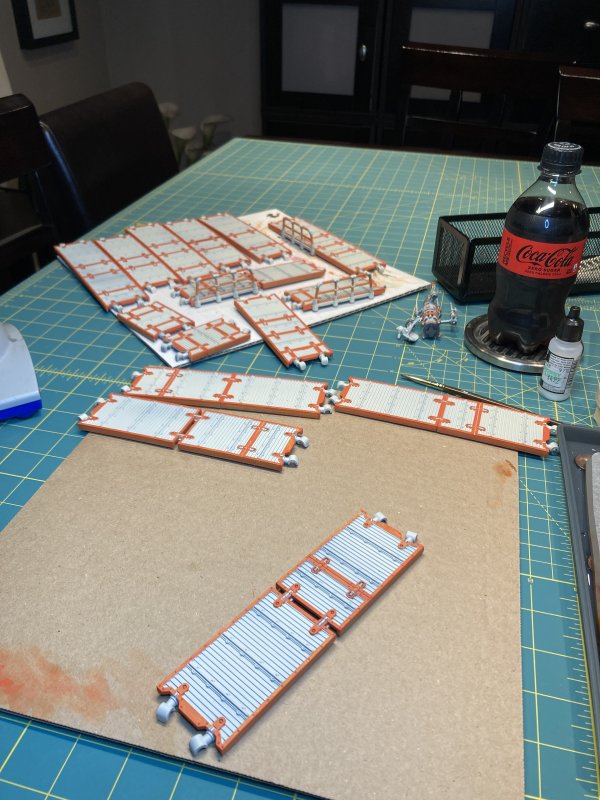
For Step three, I had to find the right orange for orange highlights. I called upon my close personal friend Charles G. for help here, because I suck at picking shades of a color. I knew I didn't want bright, vibrant orange. I took a couple of the wooden blocks I use for paint handles and used my still-had-paint 3rd can of Wraith Bone to spray all the sides. Then I took samples of various orange and applied here and there - I think there were 21 different colors by the end. The winner ended up being Army Painter Warpaint Molten Lava!
My main idea for adding those orange accents was an identifier for each building - a letter or number - and then an orange stripe around the building that was the height of that identifier. Via Amazon, I picked up ¼" letter stencils. I can add A-E on the buildings. I knew a brush wasn't really going to work with filling in the stencils, so for the 2nd time in.... at least 3 years, I was going to use my airbrush. With ample masking around the stencil and wondering how much to thin Molten Lava, I test sprayed the "A" and it turned out ok. Since I was on a roll, I added the other stencils for B-E and their associated heavy masking, and airbrushed away. By the time I removed all the stencils, the letters took pretty well, There was a little marring here and there from where templates took away a little Wraith Bone when I pulled them off, but overall I was happy.
Here we enter the first really long pause. My idea for the orange stripe was centered vertically on the building wall. The letter for each building is also orange, but I wanted to leave a little white gap between the stripe and letter. The first problem was that my letters weren't centered. They were fairly low if you were looking at the vertical alignment. Looking where that would leave the stripe across the rest of the walls, I would have to mask over a lot of greebly bits on the low side. Masking tape on irregular surfaces doesn't really work well. While testing out some masking approaches, I came across another problem (what number am I on?). There are 8 walls per building thanks to shallow angles. Going with high/low masking, the walls also angle inward. Those straight lines I was attempting to mask - nowhere near straight any more.
I started thinking of other options for the stripe. Maybe only half as high? Offset higher? A thin stripe? 2 thin strips? Vertical stripe where there's no greebly bits? I didn't like any of these ideas. Finally, I took one of the buildings and just asked myself what I could pull off with my skill level? There's some parts I could just use to highlight the orange. Some parts that are always on the top of the wall, and some gear/screw looking things near the bottom. I tried painting one, and the brush strokes afterward were horrible. Looks like another job for the airbrush. Which meant another round of masking. Lots and lots of masking. If I had planned this approach ahead of time, I would have painted the orange bits and then masked them off while I painted everything else Wraith Bone. But no, this is figuring it out on the fly.
Masking the building took a while, as I was applying tape to pretty much the whole building, and then covering up anything in the interior where some pray might seep in. Additionally, there were parts glued in, sticking outward from where I was going to spray. These had some extra masking added on, which I tried to tape to where it wouldn't block the spray from all angles. Finally, I did a test spray on the building and hit all the parts to highlight orange!
And it was pretty much crap (which I'm going to lay a lot of blame on my novice airbrush skills). The coverage was such that even after 2 coats with the airbrush, it still needed another coat - at least. My masking wasn't straight in places. My masking covered parts that should have been painted in places. Those parts sticking out were I tried not to block the spray... blocked the spray.
The time masking + quality of airbrushing wasn't where I wanted. Again, it was time to revisit what my skill level could do. Not thinning the paint as much would cut down on brush streaks. I could just mask around the bits that need painting to help keep my lines straight. Even then, it'll still probably take 2 coats. Maybe more. Using the airbrushed building as my moving forward test - as even the airbrushed spots needed another coat of touching up, I re-masked just the areas needed and tweaked my mixture of thinner and orange.
This time, not crap. After 1 coat over the airbrush, it looked like this might work. And masking really helped in a couple of awkward angles where the tape blocked an errant stroke of orange. What followed was meant to be a sequence of masking a building, then painting it while taking breaks to mask the next so that when Building A was painted, Building B would be masked and ready to paint. What ended up happened was that I got on a roll of enjoying masking (that makes no sense, but it happened). I would mask the top row bits of all the buildings, which would get me used to any quirks. Then when all of those were done, I moved to the bottom row and got used to those quirks. Before I knew it, the 4 remaining buildings were masked.
And masked they sat for a week or two. I don't know why I was putting painting off. Then Friday night, around 8:00, I had the table set up and started to paint with Def Leppard in the background. Eventually Prince was in the background. I found myself in the zone with a brush tip that was holding it's shape and a paint-thinner ratio that was just working. All the masked bits were painted with 2 coats. There were other bits I wanted a little orange on which I hadn't masked but were free-hand capable, so I continued on. A little after midnight, everything I wanted orange was orange.
There's still more to do, and honestly probably a couple more orange pieces per building, but the standard/uniform parts to be orange are. Along the way, I'm no longer scared of the airbrush. At one point, even after ultrasonic cleaning, the brush was clogged. I took the airbrush more apart than I had since taking the class where I learned how to take it apart and put it back together. It took a while to get rid of the clog as I was missing some handy tools I've since ordered from Amazon, but the highlight was noticing how the airbrush action didn't feel right with the clog, and then once I had everything back together and unclogged, I could tell the difference in the smoothness of the action. More importantly, I knew why/where the difference was caused. This type of thing is common knowledge for anyone that's used an airbrush after cleaning up a clog, but secretly it's a weird quirk or phobia that lends to why I buy so much stuff that stays in the shrinkwrap.
The next hurdles to figure out are how to clean up the little mistakes atop the Wraith Bone, and just how much weathering am I going to do?


Zombie Soldiers
06.05.2024
While waiting for the humidity to reach sub-75% for a weekend so as to not make spray priming/painting the Necromunda buildings more fo a challenge than it'll surely turn out to be, I opened up a set of Zombicide soldiers that I've had a mere 2 and a half months. It was an impulse purchase from a flash sale of some type. Zombicide is a game I don't like (after playing twice), but I like the variety of minis for the game so I still find myself supporting said game.
Zombie soldiers was a box of 6 minis cast from 2 poses. I'm not sure of the game backstory for these muscular gun-wielding zombies, but that's part of why I don't play the game. They look cool and look fun to paint. I'm in. A quick priming on a humidity friendly 10 minute window one day, and from there I was good to paint at my leisure.
And leisure I took it, as I dawdled over the course of 2 weeks to get in about 4 hours of painting/basing. This was my first use of the new rolling rack of paint to make use of the dining table setup. There was a wee transport error which occurred right after I decided it would be safer to roll the rack into/out of the hobby closet in the other (180°) direction. Said error was just an inconvenience for about an hour and resulting in no lasting damage, so that's all we'll say about that here.
With the kitchen table paint setup ready to go, I pondered how to make 3 copies of the same sculpt different. I wasn't in the mood to add greebly bits, so I just went with classic military colors - basically a khaki and 2 shades of green as the bases. While pondering I though of going full-camo with 1 set, but I just wasn't feeling the camo this time.
After adding washes and picking out details with some other colors, those 2 shades of green didn't end up as far apart as they started. And that's ok. This painting session(s) was just for some between-projects relaxation. I wasn't trying to learn something new or tweak some style I've not done in a while. Just slather on some paint and don't fret about it.
I had a little fun with the bases, once again going back to my favorite texture paint of Citadel (Something) Badlands. I just really like the way it cracks. Instead of covering the whole base for all the minis, I added dirt-sploches mixed in with some static grass.


Permalink
gaming miniatures zombicide
Necromunda Assembled
05.11.2024
2024 has not been shown to be a busy year for me in the usual post-topic work of gaming miniatures and related items and the painting thereof. Barely 1 update per month, and even then there's not much to show for it. While my excuse - do I need an excuse - has been that I'm trying to improve on my technique and not rush through painting minis, a side-truth is that I needed something a little different.
A few years ago I went to a HobbyTown in Georgia and stocked up on some models that looked fun to build. I built one that never saw the light of a camera or blog post, because it absolutely sucked. When I was 10 years old I would crank out a model in 3 hrs that I was perfectly happy with. 45 years later I spend 3 weeks on a model car and nothing lines up, gaps are everywhere, and extra nubs from the plastic sprue are everywhere. I've read a big problem with modern model kits like the car I can never prove I made, are that the kits are cast from molds that are the same as 10 year me used. Or even worse, recasts of those molds, potentially many times over.
Disgruntled old man me decided that it's time to re-learn how to make a plastic model. Model car #2 was a little better, but still crap. Those old molds are not conducive to modern-me learning. So I pivoted to known modern-molded plastic. In this case, some Games Workshop Necromunda (plastic) scenery.
A while back, as I never buy something and immediately crack open a box, I started getting Necromunda Thatos Pattern buildings - Hab Modules and walkways, with Ash Wastes being the set that came with more stuff/rules than I will use, but the price was cheaper than the individual scenery pieces.
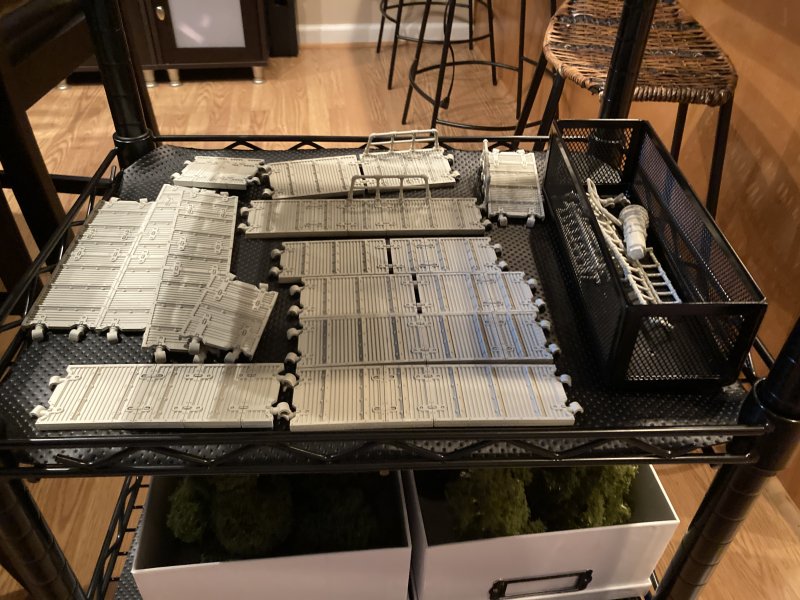
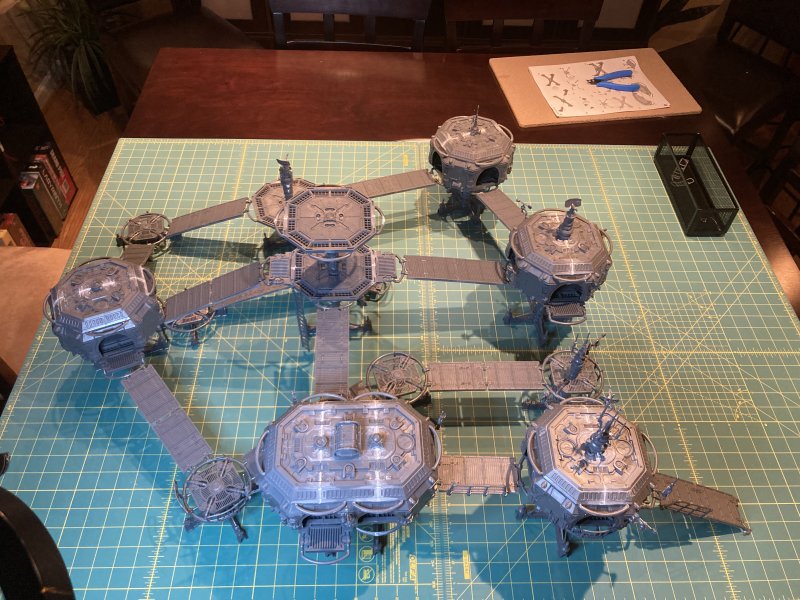
I had a fairly simple color scheme picked out (more on that in a later post) which will work better trying to paint everything at once. Which leads to making everything at once. I did say I wanted to practice on plastic models. Two months ago, I started putting together the first Hab Module kit, and then kept on gluing, snipping, and sanding until everything was built.
I had no idea I had gotten so much of this stuff.
Along the way, most things lined up, or at least lined up better than the model cars I've been trying to make. Old man me uses nippers to cut the parts off the sprue, instead of twisting them off like 10 year old me would do. A long time ago, it was twist part off and then glue together. Now, there is snip, and then a long and involved sanding process. I've got a variety of sanding strips to try and clear the mar on the plastic left from separating from the sprue - this was the big new-to-me thing learned from the model car kits. After lots of sanding is good old glue/plastic cement. There's then potential for more sanding, as that's when I look for places that need some gaps filled, and post-filled sanding.
That's where we are now. Glued, sanded, ready for primer. Once the humidity is down to being spray-paint friendly. Plus, I'm not in a rush. I may need a zombie painting fix next.


Blog Archive
As always, correct spelling is optional in any blog entry. Keep in mind that any links more than a year old may not be active, especially the ones pointing back to Russellmania (I like to move things around!).
Tags have been added to posts back to 2005. There may be an occasional old blog that gets added to the tag list, but in reality what could be noteworthy from that far back?
Blog Tags
3D Printer (26)
4ground (32)
4ground-mall (40)
action figures/toys (10)
airbrush (7)
Aliens (1)
Amazon (12)
antenocitisworkshop (11)
Atlas O Gauge (2)
Batman Miniature Game (2)
Battletech (1)
belt sander (12)
Blood Bowl (4)
boardgames (77)
books/comics (19)
computers hate me (5)
conveyances (15)
diet (53)
dreams (7)
fallout (1)
feng shui (1)
Foundry (3)
Gale Force Nine (1)
game dev (22)
gaming miniatures (230)
gaslands (10)
gastric sleeve (34)
Green Stuff World (2)
Hasslefree (9)
Hero Forge (1)
hobbies (101)
Jailbirds Minis (2)
kevin smith (1)
Knight Models (2)
malifaux (2)
Marvel Crisis Protocol (2)
mckays (1)
models (11)
mom (32)
moon light (5)
movies/tv/dvd (60)
Necromunda (3)
ninja division (1)
Pathfinder Deepcuts (1)
pilonidal cyst (5)
plastcraft (2)
programming/interweb (41)
rambling (60)
random (366)
random maintenance (3)
Reaper Bones (3)
reaper chronoscape (32)
renovation/remodelling (25)
road trip (27)
salesforce (1)
sarissa precission (2)
scenery (18)
studio miniatures (3)
ttcombat (12)
video games (51)
walking dead (36)
wargame foundry (3)
work (6)
wrestling (45)
zombicide (2)
Zombicide Invader (19)
zombie mall (23)